Guide to help you implement RAID 1 (Mirror Disk) on Windows Server.
RAID 1 (Mirror Disk)
RAID level 1 is disk mirroring. With disk mirroring, you use identically sized volumes on two different drives to create a redundant data set. Here, the drives are written with identical sets of information and, if one of the drives fails, you can still obtain the data from the other drive (mirror disk).
Disk mirroring offers about the same fault tolerance as disk striping with parity. Because mirrored disks don’t need to write parity information, they can offer better write performance in most circumstances. However, disk striping with parity usually offers better read performance because read operations are spread out over multiple drives.
The major drawback to disk mirroring (RAID 1) is that it effectively cuts the amount of storage space in half. For example, to mirror a 5-GB drive, you need another 5-GB drive. That means you use 10 GB of space to store 5 GB of information.
If possible, it’s a good idea to mirror boot and system volumes. Mirroring these volumes ensures that you’ll be able to boot the server in case of a single drive failure.
As with disk striping, you’ll often want the mirrored disks to be on separate disk controllers. This provides increased protection against failure of the disk controller. If one of the disk controllers fails, the disk on other controller is still available. Technically, when you use two separate disk controllers to duplicate data, you’re using a technique known as disk duplexing. Figure 12-5 shows the difference between the two techniques. Where disk mirroring (RAID 1) typically uses a single drive controller, disk duplexing uses two drive controllers.

Although disk mirroring (RAID 1) typically uses a single drive controller to create a redundant data set, disk duplexing uses two drive controllers. Other than this, the two techniques are essentially the same.
If one of the mirrored drives in a set fails, disk operations can continue. Here, when users read and write data, the data is written to the remaining disk. You’ll need to break the mirror before you can fix it.
Creating a Mirror Set in Disk Management
You can create a mirror set by completing the following steps:
- In the Disk Management Graphical View, right-click an area marked Unallocated on a dynamic disk and then choose New Volume. This starts the New Volume Wizard. Read the welcome page, and then click Next.
- Select Mirrored as the volume type and create the volume. The key difference is that you must create two identically sized volumes and these volumes must be on separate dynamic drives. You won’t be able to continue past the Selected Disks window until you have selected the two disks that you want to work with.
- As with other RAID techniques, mirroring is transparent to users. Users see the mirrored set as a single drive that they can access and use like any other drive.
The status of a normal mirror is Healthy. During the creation of a mirror, you will see a status of Resynching. This tells you that Disk Management is creating the mirror.
Mirroring an Existing Volume
Rather than creating a new mirrored volume, you can use an existing volume to create a mirrored set. To do this, the volume you want to mirror must be a simple volume and you must have an area of unallocated space on a second dynamic drive of equal or larger space than the existing volume.
In Disk Management, you can apply a mirror to an existing volume by completing the following steps:
- Right-click the simple volume you want to mirror and then select Add Mirror. This displays the Add Mirror dialog box.
- Use the Disks list box to select a location for the mirror and then click Add Mirror. Windows Server 2003 begins the mirror creation process and you’ll see a status of Resynching on both volumes, as shown in the following figure.
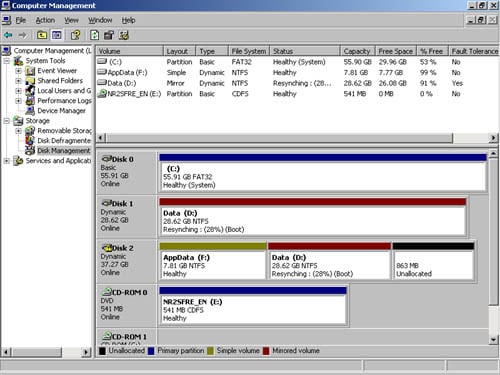
When the mirror is being created, you’ll see a status of Resynching. The disk on which the mirrored volume is being created also has a warning icon.
